Creating WAAX Plug-in
If you are not familiar with the concept of plug-in in music production, I recommend you to read these resources first.
Generator, Processor and Analyzer
WAAX currently defines 3 types of plug-in: Generator, Process and Analyzer. They have different configuration in terms of the internal audio routing. Note that the encapsulation is made possible by a predefined set of gain nodes. The following diagrams show how internal nodes are connected.
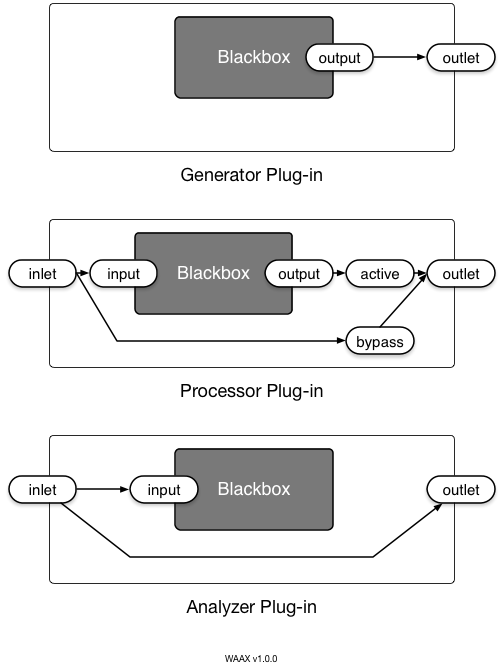
The examples of each plug-in type are:
- Generator: a synthesizer or sampler.
- Processor: an effect unit such as compressor, delay, distortion or reverb.
- Analyzer: a special unit for visualization, metering and event generation.
Blackboxes above are to be filled in by a developer. All other stuffs - preset/parameter management, two-way binding, standardized input/output and more - will be managed by WAAX.
Parameter and Handler
Before writing a plug-in, it is useful to understand how the parameter handler works. A WAAX plug-in has its own parameter layer and it is designed to abstract AudioParam object.
When you define a parameter in a plug-in, you are required to write a handler for the parameter. Once it is set up, changing the parameter value automatically triggers the corresponding handler to perform scaling and mapping. Note that WAAX parameter can support 'one-to-many' mapping scheme.
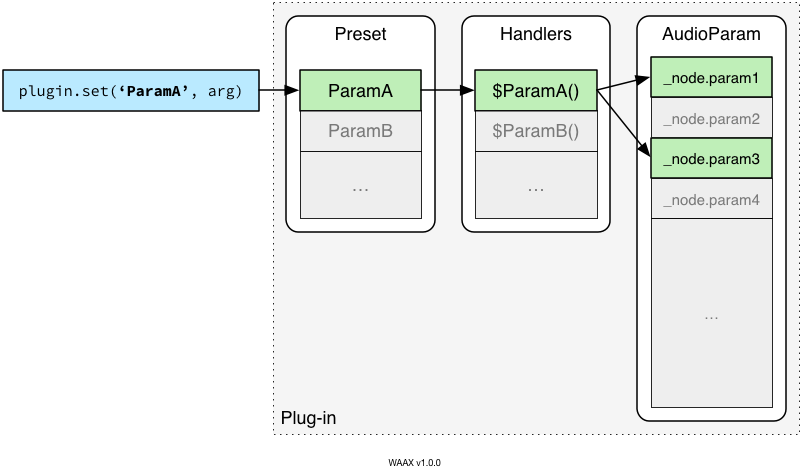
With this mechanism, you can have an abstract preset (a collection of WAAX parameters) which can be mapped into multiple AudioParam instances in a flexible fashion.
The handler is a quite powerful tool especially when you want to use MUI elements (i.e. knobs, sliders and etc.) for parameter control. You can get two-way binding between a parameter and a GUI element with a single line of code.
Building WAAX Plug-in
This section shows the anatomy of plug-in building procedure. Before jumping right into the code example, here is the summary of each step:
- Create IIFE encapsulation and define a class
- Write the class constructor
- Define plug-in type
- Do your stuff: node creation/patching and etc.
- Define WAAX Parameters
- Initialize Preset
- Write the class prototype
- Write plug-in info
- Write plug-in default preset
- Write handler methods for WAAX parameters defined above
- Wrapping up
- Extend the prototype with predefined plug-in types
- Register the plug-in under WX namespace.
It might be too much to digest at a glance, but it is nothing more than defining a JavaScript class. As the simplest example, the complete source code of SimpleOsc plug-in can be found here.
1. IIFE Encapsulation and Class Definition
(function (WX) {

  // Plug-in constructor (Step 2)
  function MyPlugin(preset) {}

  // Prototype (Step 3)
  MyPlugin.prototype = {};

  // Define plug-in type (Step 4)
  WX.Plugin.extendPrototype(MyPlugin, 'Processor');

  // Register plug-in into WX namespace (Step 4)
  WX.Plugin.register(MyPlugin);

})(WX);
The above snippet is a fundamental scaffolding of WAAX plug-in. For the safe encapsulation, Using IIFE is strongly recommended. Other than that, it is a plain JavaScript class definition. For the next step, the constructor needs to be filled in.
2. Plug-in Constructor
function MyPlugin(preset) {

  // 1. define plug-in type
  WX.Plugin.defineType(this, 'Processor');

  // 2. create and patch native nodes
  this._input.to(this._output);

  // 3. define WAAX parameters
  WX.defineParams(this, {
    sweet: {
      type: 'Boolean', default: false
    },
  });

  // 4. initialize preset
  WX.Plugin.initPreset(this, preset);
}
Among the steps shown above, 1, 3 and 4 are mandatory for the plug-in to run properly. The most important thing is the step 1 because it creates the internal routing so you can input or output sound. In the current version (1.0.0), you can choose one plug-in type from Generator, Processor and Analyzer.
Step 3 is to define WAAX parameters and note that you need to define the corresponding handler in the prototype.
3. Plug-in Prototype
MyPlugin.prototype = {

  // 1: plug-in info
  info: {
    name: 'MyPlugin',
    api_version: '1.0.0-alpha2',
    plugin_version: '1.0.0',
    author: 'Hongchan Choi',
    type: 'Processor',
    description: 'Dummy Plug-in'
  },

  // 2: default preset
  defaultPreset: {
    sweet: false
  },

  // 3: define handlers
  $sweet: function (value, time, xtype) {
    // do something when parameter 'sweet' changed
  }
};
A plug-in prototype is consist of plug-in information, default preset and handlers: filling the info and default preset should be straightforward. Writing handlers is not difficult if you have a solid idea on how to scale and map parameters.
4. Wrapping Up
WX.Plugin.extendPrototype(MyPlugin, 'Processor');
WX.Plugin.register(MyPlugin);
Just copy and paste two lines above and replace the constructor name and the plug-in type accordingly.
How to Use Plug-in
Load your plug-in script file after WAAX core library. Then you can use it under WX namespace.
<script src="waax.min.js"></script>
<script src="MyPlugin.js"></script>
<script>
  var myplugin = WX.MyPlugin({ sweet: true });
  myplugin.set('sweet', false);
  myplugin.to(WX.Master);
</script>